Editing Your Videos
Within the Panopto editor you can make cuts, import and edit captions, add slides or a quiz and embed youtube videos. You can also change the title and description of the video and add or delete video streams.
It's often not necessary to edit your videos, but you may want to do so. And sometimes you might need to make a few alterations to your video, such as cutting the start or end off your recording. The instructions below outline the basics of editing a video in Panopto.
Deciding to edit a video
You might need to make cuts in your video if:
You might need to make cuts in your video if:
- There was a portion of the lecture which included sensitive material, copyright material or private discussion where students were captured.
- Sections of the recording capture content that is not valuable in the recording (e.g. periods of student group work).
- You started your lecture a while after the recording began, or finished the lecture before the recording ended.
- Quizzes can be added to test student comprehension and/or to help students engage and identify key points.
- Youtube videos can be inserted into your recording if there is a small clip that you want to share and discuss.
- Slides can be uploaded if you didn't capture them in your recording.
|
Using the Panopto editor
To open the Panopto editor, locate the video in Panopto that you want to edit, hover over the video and select the 'Edit' button. |

|
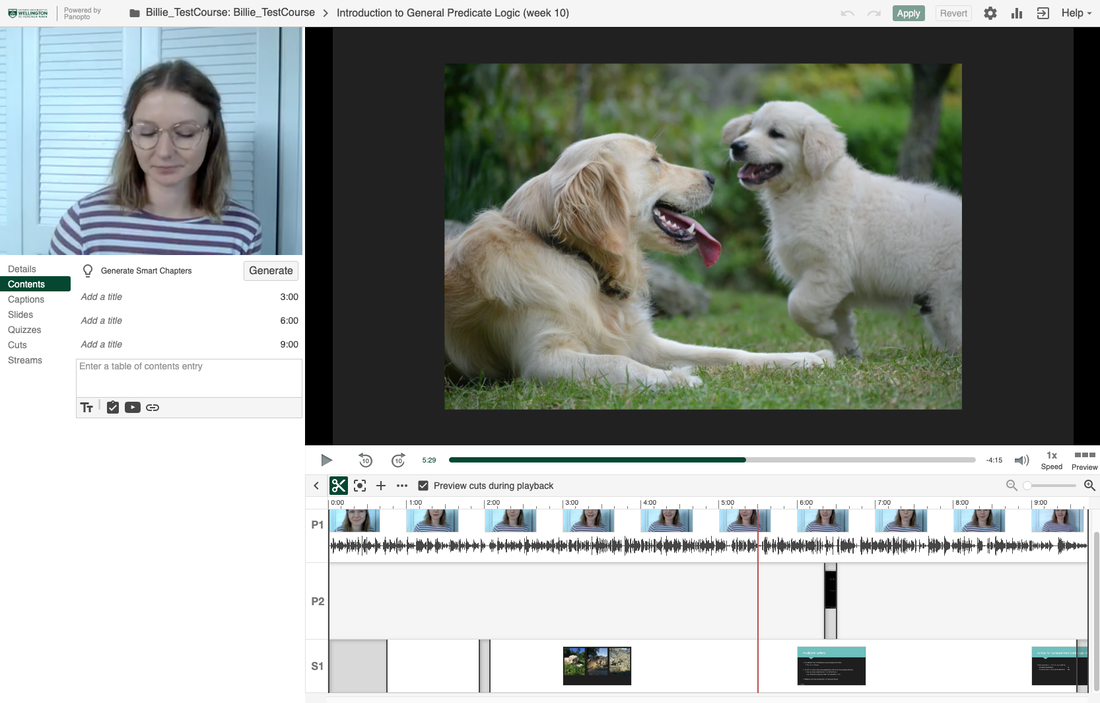
This will open your video in the editor mode (e.g. see the screenshot below). You can make your desired edits, as per the following instructions, and then select the green 'Apply' button in the top right of the screen to save your edits. Panopto's editor is a nondestructive editor, meaning that your edits will not destroy the original video, and thus you can revert your edits at anytime.
To find out more about using the Panopto editor, see Panopto's video editor information page.
Check out Panopto's 'Learn About the Video Editor' video for a quick overview.
Check out Panopto's 'Learn About the Video Editor' video for a quick overview.
Making cuts
Trim out parts of your video by using the cut tool in the timeline along the bottom of the editor window. Simply click and drag across the unwanted part of the video in the timeline in order to make a cut. Cut sections will display in grey on the editor's timeline, but will not play back in the Panopto viewer after you have applied your edits. To learn how to make cuts in the Panopto editor, watch Panopto's 'Edit a Video' video.
Trim out parts of your video by using the cut tool in the timeline along the bottom of the editor window. Simply click and drag across the unwanted part of the video in the timeline in order to make a cut. Cut sections will display in grey on the editor's timeline, but will not play back in the Panopto viewer after you have applied your edits. To learn how to make cuts in the Panopto editor, watch Panopto's 'Edit a Video' video.
Editing the details of the video
The name of the video can be changed along the top bar of the window. The video description and table of contents can also be edited. Instructions for how to edit such details is covered in Panopto's 'Learn About the Video Editor' video (start at approx. 02:35).
The name of the video can be changed along the top bar of the window. The video description and table of contents can also be edited. Instructions for how to edit such details is covered in Panopto's 'Learn About the Video Editor' video (start at approx. 02:35).
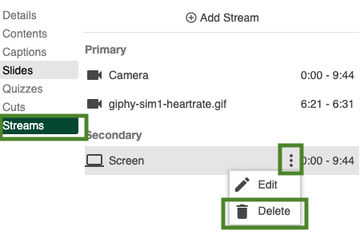
Deleting unwanted streams
|
To delete a stream of your video:
Please note, you cannot delete your only 'Primary' Stream. |
|
Adding, editing and removing captions
Panopto can create machine-generated captions for any video uploaded to it. Captioned videos provide a better experience for all students as well as improved accessibility.
Add:
Within the Panopto editor, captions can be added to your video.
Once you have captions on your video, you can edit them, delete individual captions, or add additional captions.
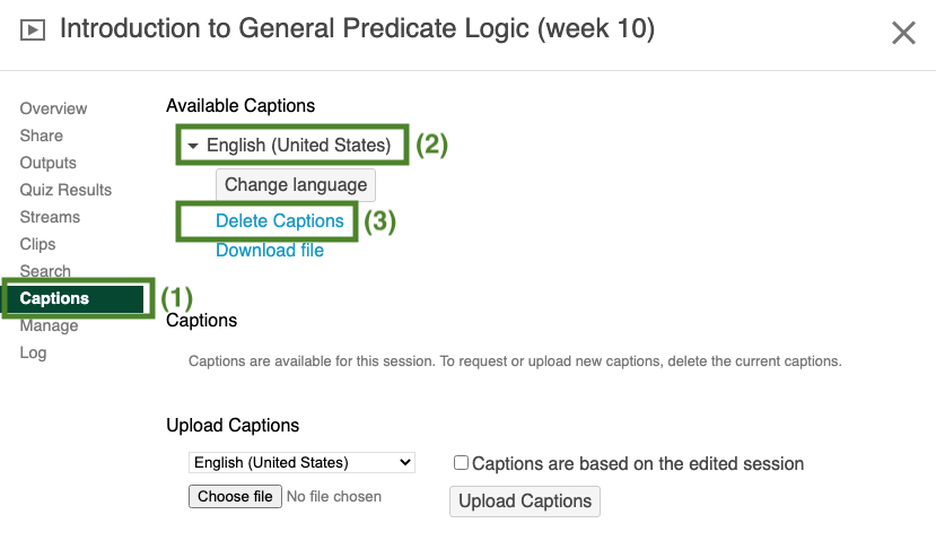
Remove:
To remove all captions, you need to open the video settings by clicking on the settings cog in the top right hand corner of the editor screen (see below). In the settings window:
Panopto can create machine-generated captions for any video uploaded to it. Captioned videos provide a better experience for all students as well as improved accessibility.
Add:
Within the Panopto editor, captions can be added to your video.
- Instructions for how to add automatic captions is covered in Panopto's 'How to Add Automatic Captions to a Video' video.
- Instructions for how to add manual captions is covered in Panopto's 'How to Manually Caption Sessions in the Editor' video.
Once you have captions on your video, you can edit them, delete individual captions, or add additional captions.
Remove:
To remove all captions, you need to open the video settings by clicking on the settings cog in the top right hand corner of the editor screen (see below). In the settings window:
|
|
|
Enabling machine-generated captions for a whole course
If you’d like every new video released in your course to be automatically captioned, it’s easiest to turn that feature on at the folder level. To do so:
If you’d like every new video released in your course to be automatically captioned, it’s easiest to turn that feature on at the folder level. To do so:
- Navigate to your course folder page
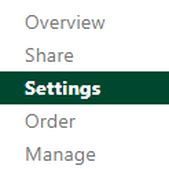
- Press the cog in the top right corner to enter Folder Settings
- Open the "Settings" sub-menu
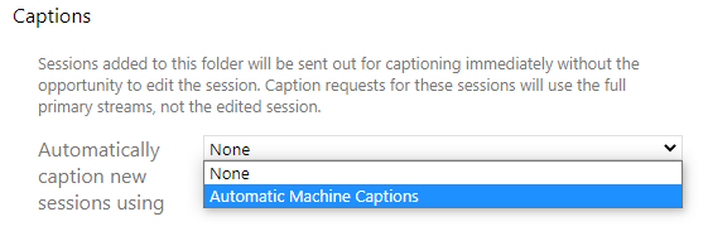
- Expand the “Automatically caption new sessions using” dropdown and change it to “Automatic Machine Captions”
- You’re done! Any video released in your course after this will have automatically generated captions
|
|
How to make Panopto’s machine-generated captions more accurate
(Advice from Disability Services Captioning project)
The accuracy of Panopto’s machine-generated captions depends greatly on the quality of the video’s audio. Here are some things you can do to make Panopto’s machine-generated captions more accurate:
(Advice from Disability Services Captioning project)
The accuracy of Panopto’s machine-generated captions depends greatly on the quality of the video’s audio. Here are some things you can do to make Panopto’s machine-generated captions more accurate:
- You must be using Microphones. Use the Lapel mic where possible but also turn on the lectern mics.
- Enunciate clearly
- Avoid tangents where possible
- Speak at a consistent pace, and pause when you finish each sentence
- If you’re using a desk mic, keep close to the desk
- When a student is asking a question, hand them the microphone or use the catch box mics. If you can’t, repeat the student’s question out loud
- Make sure complex jargon is communicated via lecture slides or course notes, since machine-generated captions will rarely pick it up
Adding other media to your video
Within the Panopto editor you can add:
Within the Panopto editor you can add:
- A weblink - instructions on Panopto's 'How to Embed a Webpage into a Video' video
- Slides - instructions on Panopto's 'How to Add and Edit Slides in the Editor' video
- A quiz - instructions on Panopto's 'How to Add a Quiz to a Video' video
- A Youtube video - instructions on Panopto's 'Embedding a YouTube Video' video
Further edits
If you want to know more about editing in Panopto, or to get help with something not covered on these pages, refer to Panopto's support information on editing or their editing how to videos, talk to your CAD adviser or request specific support for VStream editing by contacting the Digital Solutions Staff Service Centre.
If you want to know more about editing in Panopto, or to get help with something not covered on these pages, refer to Panopto's support information on editing or their editing how to videos, talk to your CAD adviser or request specific support for VStream editing by contacting the Digital Solutions Staff Service Centre.
